These tips are from PickYourOwn.org which we have been using for the past few years for timing
and tips on a lot of food preservation. We also like Piers Warren’s book, How to Store Your Garden Produce, a bit of translation needed as it is a British book, but it is clear and simple!
How to Freeze Green Beans, Items Needed:
fresh green beans – any quantity. I figure one handful per serving. Vacuum food sealer or “ziploc” type freezer bags (the freezer bag version is heavier and protects better against freezer burn.
1 Large pot of boiling water
2 large bowls, one filled with cold water and ice.
1 sharp knife Instructions
Step 1 – Get yer green beans! Start with fresh green beans – as fresh as you can get.
Step 2 – Wash the green beans! I’m sure you can figure out how to rinse the green beans in plain cold or lukewarm water.
Step 3 – Trim the ends and cut into smaller pieces Just take a sharp knife and cut of both ends (about 1/4 of an inch, or half the width of an average woman’s little finger). Then cut them into pieces of the size you prefer, usually about 1 inch long. Of course, if your prefer French cut green beans, you can cut the beans lengthwise instead, or you can use a “bean Frencher”. The “Frencher” enables you to prepare a huge quantity of beans quickly! See the bottom of this page for makes, models, prices and ordering info for bean frenchers. [NOTE: we also just break off the stem end and freeze them whole…all options work]
Step 4 – Get the pots ready Get the pot of boiling water ready (about 2/3 filled) and a LARGE bowl with ice and cold water. [or your sink]
Step 5 – Blanch the green beans. All fruits and vegetables contain enzymes and bacteria that, over time, break down the destroy nutrients and change the color, flavor, and texture of food during frozen storage. green beans requires a brief heat treatment, called blanching, in boiling water or steam, to destroy the enzymes before freezing. Blanching times for beans is 3 minutes (the duration should be just long enough to stop the action of the enzymes and kill the bacteria). Begin counting the blanching time as soon as you place the green beans in the boiling water. Cover the kettle and boil at a high temperature for the required length of time. You may use the same blanching water several times (up to 5). Be sure to add more hot water from the tap from time to time to keep the water level at the required height.
Step 6 – Cool the green beans Cool green beans immediately in ice water. Drain the green beans thoroughly (this shouldn’t take more than a minute). After vegetables are blanched, cool them quickly to prevent overcooking. Plunge the green beans into a large quantity of ice-cold water (I keep adding more ice to it). A good rule of thumb: Cool for the same amount of time as the blanch step. For instance, if you blanch sweet green beans for 7 minutes, then cool in ice water for 7 minutes. Drain thoroughly. [We also dry, wrapping them in towels to get out as much water as possible]
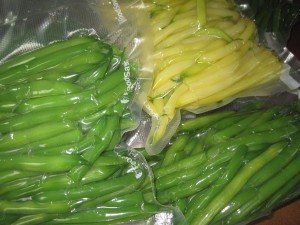
Step 7 – bag the green beans I love the FoodSavers (see this page for more information) with their vacuum sealing! I am not paid by them, but these things really work. If you don’t have one, Ziploc bags work, too, but it is hard to get as much air out of the bags. Remove the air to prevent drying and freezer burn. TIP: If you don’t own a vacuum food sealer to freeze foods, place food in a Ziploc bags, zip the top shut but leave enough space to insert the tip of a soda straw. When straw is in place, remove air by sucking the air out. To remove straw, press straw closed where inserted and finish pressing the bag closed as you remove straw. It works fairly well, but I’ll stick to the Foodsaver, since the bags are microwaveable and much thicker than a Ziploc bag (even the Ziploc “freezer bags”)
Step 8 – Done! Pop them into the freezer, on the quick freeze shelf, if you have one!

